By Diane Otto
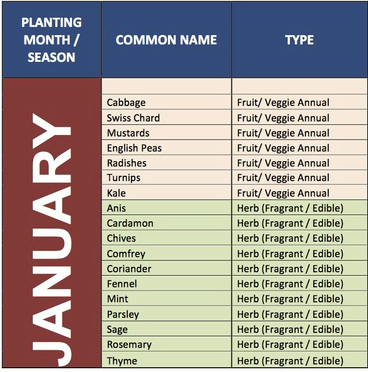
Follow our crop lists, season by season,
for a garden as small or as large as you like...
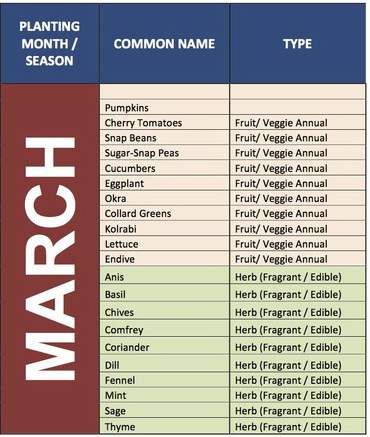
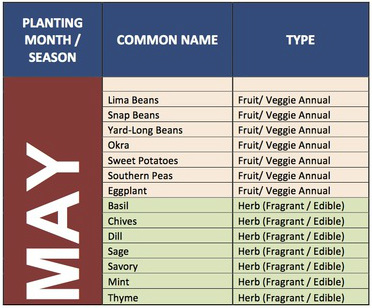
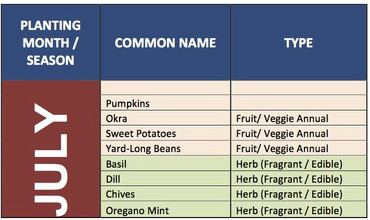
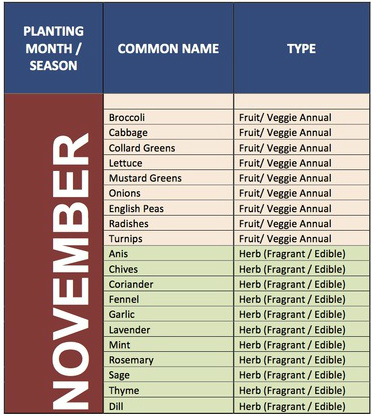
Essential to creating a garden is knowing which species to plant and when to plant them. Many times stores sell crops that are meant for a different climate or are out of season; even two weeks can make or break a crop. Basic guidelines on the internet or in print may be helpful but they are not accurate because they do not cover micro-climates or local areas. This type of knowledge comes only from experience gardening in the same areas year after year. Thus we created a spreadsheet that is specific to Gainesville--from over 25 years experience of when and what to plant right here in our town. For spring season crops, plant as soon as the last frost has passed. The below planting lists are guidelines and are to be used alongside judgement of weather and time period until harvest. For example, a good rule of thumb is to estimate three to four months until harvest--if you buy seed packets, however, the time until harvest should be listed on the packet. Allow enough time for the later summer crops to grow and to fruit before the cooler weather begins. Three key components to a successful garden are 1) choosing a location that has FULL SUN, and 2) monitoring your garden regularly because early detection and control of pests is key (and also weeding is important to eliminate root competition), and 3) watering regularly. With these three components in mind, the following planting lists should help even the most novice gardeners establish a home garden. The following plants species were chosen for hardiness, ease of growing, and harvest quantity.
Summary of Steps
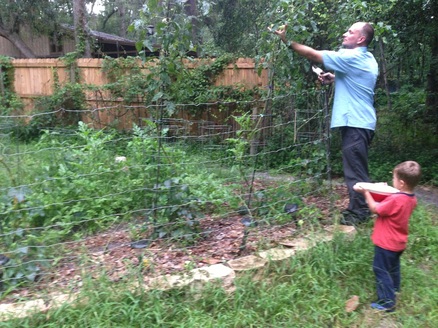
Creating the B'nai Israel Day School Garden:
Use these steps as instructional guidelines to build your own home garden.
1. A delineated garden space was tilled two times with a gasoline-powered tiller to break the earth and prepare the soil.
2. A fully functioning irrigation system was installed. The system includes:
A) Commercial-grade, non-kink hoses (top-notch hoses are essential—never skimp
on the hoses in order to avoid serious malfunctions in the future). The hoses
are weaved through the back fence to avoid tripping and also so they are not
easily seen. In the near future, we will improve this system by installing
underground irrigation (e.g. run water through underground PVC pipes).
B) The hose leads to a sprinkler in the garden’s center and is connected to a re-
bar post. The sprinkler is an impact sprinkler (a spinner sprinkler that rotates a
half- or whole circle) and thus follows the border of a circular garden.
C) There is a split installed so one hose leads to the sprinkler and another hose is
free for hand watering and personal use—so you have a water supply that is
not taken up by the sprinkler. The hose for manual use remains to the side of
the garden.
D) There is a timer attached to the sprinkler and it is set to run automatically at
crop- and season-appropriate settings. The timer also has a manual option for
supplementary irrigation. (NOTE: For water conservation, automatic irrigation
should have a rain sensor that cuts off irrigation if it rains.)
E) The sprinkler timer is enclosed in a waterproof box.
3. Crops were planted according to season and expert knowledge
4. 47 bags of mulch were laid and three bags were put in reserve
5. A commercial-grade compost bin was installed
6. There is a small space left unplanted and un-mulched directly in front of the sprinkler. This space was left open for garden additions--
another kind of crop, a child activity center, a science center, etc.
7. A fence running the circumference of the planted space and a gate door was installed. (An arbor over the gate door can be added later…
fragrant jasmine on the arbor is often a favorite.)
Some basic notes
The real work of installing a garden is complete once the earth has been moved and shaped, the soil tilled, and the irrigation and power source installed. After this initial set-up, it is simply a matter of basic maintenance, knowing which crops to plant for each season, re-tilling between seasonal gardens when necessary, and adding to the garden.
Future Additions to the Garden
- Aesthetics (Pavers, Bricks, Lights, Arbor, Fencing, etc.)
- Science and Activity Centers (Bean Teepee, Windmills, Sundials, Rain Gauge, Weather Station, Element Station, Wind and Solar Energy Station, Grow Station, etc.)
- Underground Irrigation
- Rain Barrels
- Signage
